
How to wire DMX pixel addressable LED Strip Light
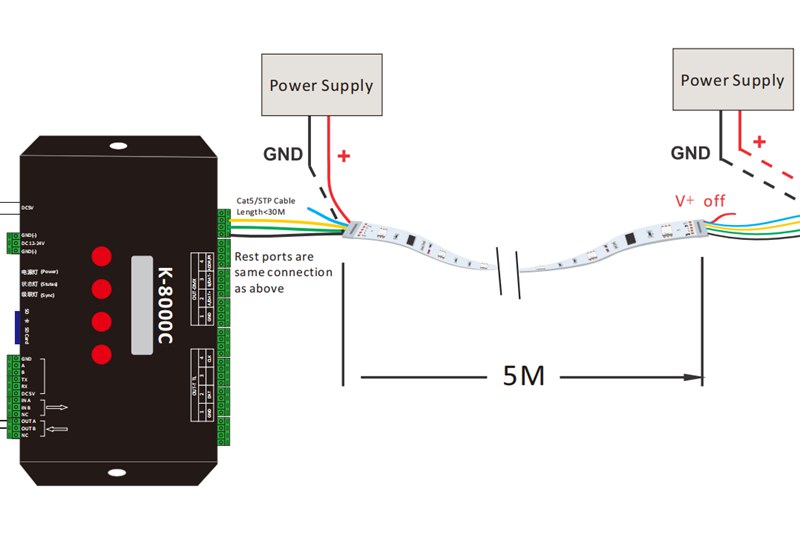
DMX pixel addressable LED strip lights are widely used in stage lighting, clubs, building outlines, and media facades. They offer more accurate control and dynamic effects than regular LED strips, especially in larger systems.
This article covers 4-wire and 5-wire DMX512 LED strips, common models and controllers, and three common wiring methods: offline control, online Madrix control, and lighting console
What is a DMX pixel addressable LED strip?
A DMX pixel addressable LED strip is a digital LED strip that receives control signals through the DMX512 protocol. Unlike normal constant-voltage LED strips, this type of strip contains ICs, so different pixels or pixel groups can be controlled separately. Because of this, DMX pixel LED strips can show effects such as chasing, flowing, gradients, scanning, and programmed scene changes.
This type of strip is often used in more professional projects because DMX control is stable, compatible with many systems, and suitable for longer-distance communication. It can work with offline controllers, software systems such as Madrix, and also with professional lighting consoles.
4-wire and 5-wire DMX pixel LED strips
DMX512 pixel LED strips can usually be divided into 4-wire and 5-wire types. In practical projects, the 5-wire version is more common, but some models are still designed as 4-wire types.
A 4-wire DMX pixel LED strip normally uses V+, GND, DAT, and PI. A typical example is the UCS512B3 LED Strip, which is a 4-wire DMX512 pixel LED strip.
A 5-wire DMX pixel LED strip normally uses V+, GND, A, B, and PI. Many common DMX512 pixel LED strip models used in projects belong to this more common wiring structure.
Put simply, the biggest difference is on the signal side. The 4-wire type uses a simpler signal connection, while the 5-wire type uses a more standard DMX signal structure. Because of that, the 5-wire version is more often seen in engineering and professional lighting projects.
Common DMX512 pixel LED strip models
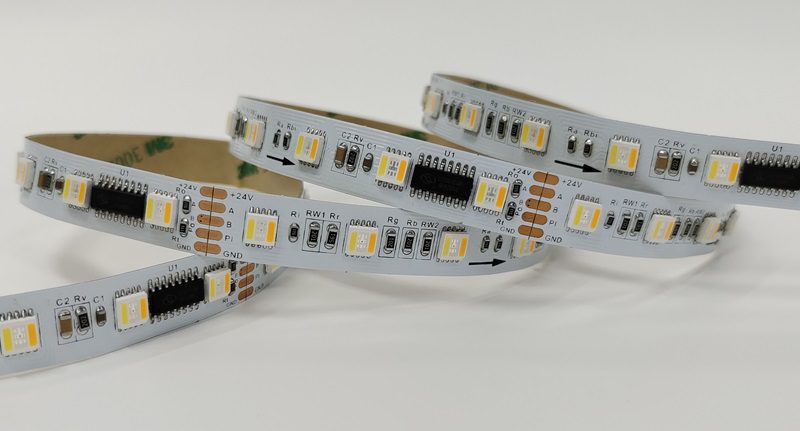
There are several common DMX512 pixel LED strip models used in the market, such as UCS512G6 RGB+CCT LED Strip, SM18512 LED Strip, TM512AC LED Strip, TM512AC4 LED Strip, UCS512C4 LED Strip, UCS512B3 LED Strip, and UCS512H4L LED Strip.
Among these models, UCS512B3 LED Strip is a 4-wire DMX512 LED strip. In practical applications, many other common DMX512 pixel LED strips are more often used in 5-wire wiring systems, which is also why 5-wire DMX512 LED strips are generally more common in lighting projects.
Most DMX512 LED strips have their current already set by the IC, so the power usually cannot be changed. However, UCS512C4 LED Strip is a special model because its power can be changed, which makes it different from most standard DMX512 pixel LED strips.
Basic wiring idea before installation
Before wiring the strip, the first thing to check is the working voltage. DMX pixel LED strips are commonly available in DC5V, DC12V, or DC24V. The power supply must match the strip voltage. If the strip is 24V, the system should use a 24V power supply. If the strip is 12V, the system should use 12V. Wrong voltage may cause unstable performance, color problems, or even damage.
The second important point is the signal input direction. DMX pixel LED strips usually have an input side and an output side. The controller must connect to the input side of the strip. If it is connected to the wrong end, the strip may not respond correctly.
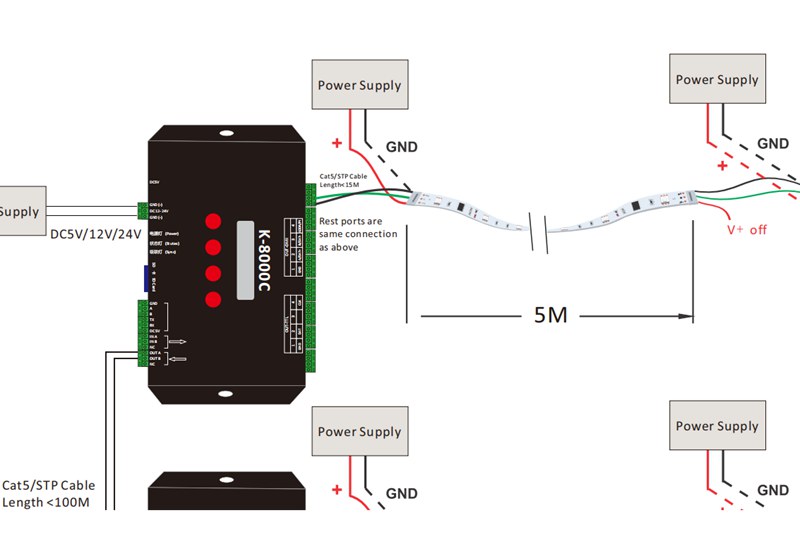
The third point is power injection. In the connection diagrams, extra power is added every 5 meters. This is very important in long runs. As the strip becomes longer, voltage drop becomes more obvious. If extra power is not added, the far end of the strip may become dim, unstable, or show wrong colors.
The fourth point is cable length. In the close-up diagrams, the signal cable between controller and strip is marked as Cat5/STP cable, length less than 30 meters. In the larger control diagrams, the cable between controllers or network devices can reach less than 100 meters. Keeping signal wiring within a reasonable range helps improve stability.
How to wire a 4-wire DMX pixel LED strip
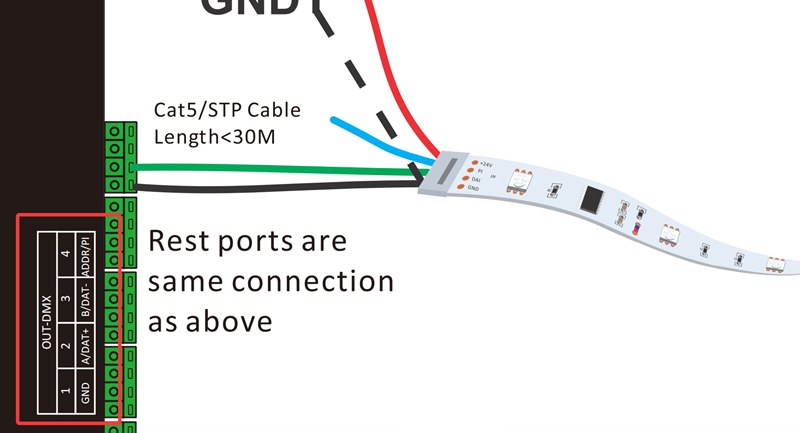
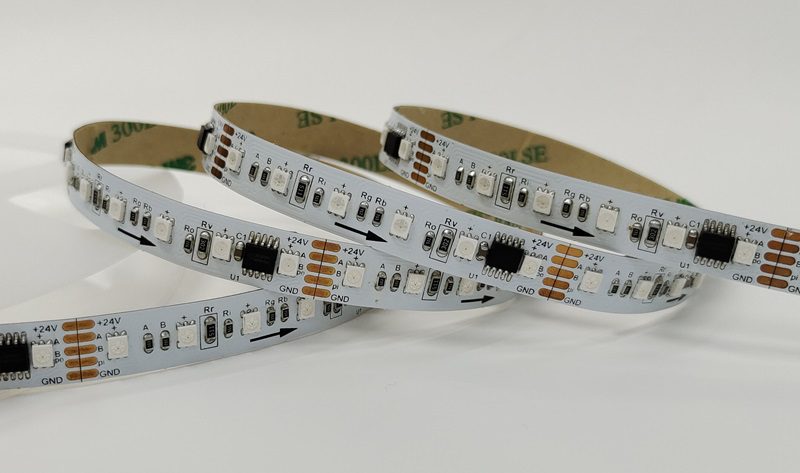
For a 4-wire DMX pixel LED strip, the strip side usually has +24V, PI, DAT, and GND. On the controller side, the output terminals are marked as GND, A/DAT+, B/DAT-, and ADDR/PI.
In this wiring method, the power supply provides the correct DC voltage to the strip. Then the controller connects the signal lines to the strip input side. The ground line connects to ground, the PI no need to connect, and the data line connects to the strip data input. Because different manufacturers may use slightly different pad names, it is always a good idea to check the labels printed on the strip before final wiring.
How to wire a 5-wire DMX pixel LED strip
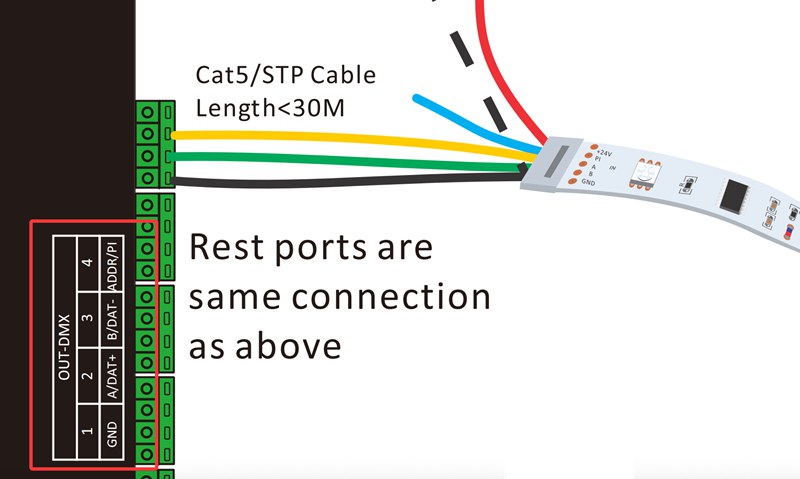
A 5-wire DMX pixel LED strip usually has +24V, PI, A, B, and GND on the strip side. This is the more common type in DMX pixel lighting projects.
In this wiring method, the power wires connect in the normal way: V+ to V+ and GND to GND. On the signal side, the controller output connects to A, B on the strip and no need to connect PI on the LED Strip.
From the diagram, the recommended signal cable is Cat5/STP cable, and the distance between controller and strip should be kept within 30 meters. This helps maintain reliable signal transmission.
Offline control wiring
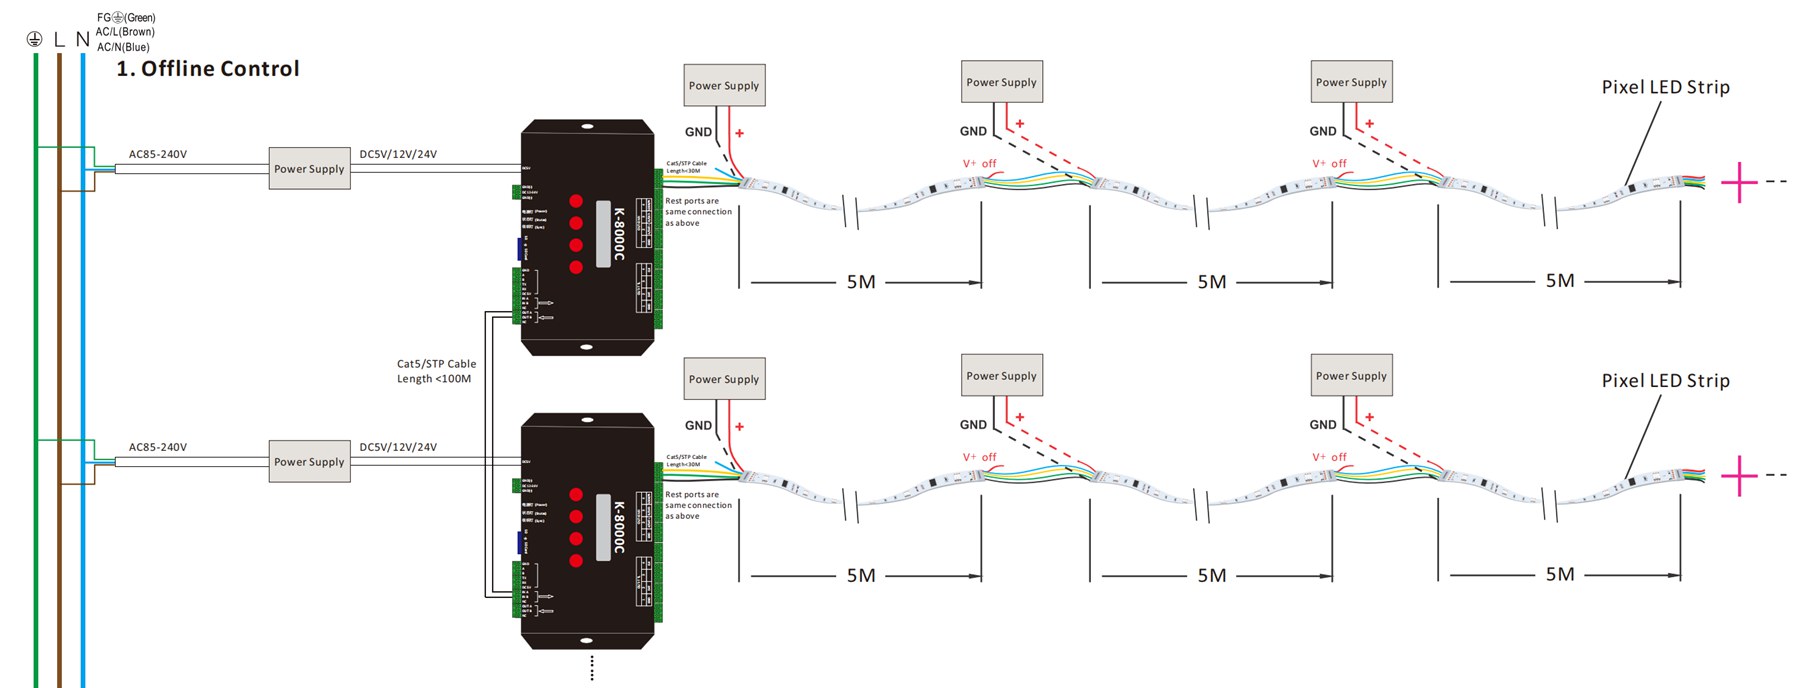
Offline control is suitable for projects that do not need a live computer. In this setup, the power supply converts AC85–240V into the required DC5V, DC12V, or DC24V, depending on the strip type.
The offline controller then sends the DMX signal to the LED strip. As shown in the diagram, one controller drives one strip run, and power is injected every 5 meters to reduce voltage drop. At each injection point, the positive line is cut between sections and marked as “V+ off”, while the ground remains connected. This helps avoid power conflict between different injection points.
Offline control is a practical choice for fixed installations such as building outlines, facade lighting, and other pre-programmed projects.
Online Madrix control wiring
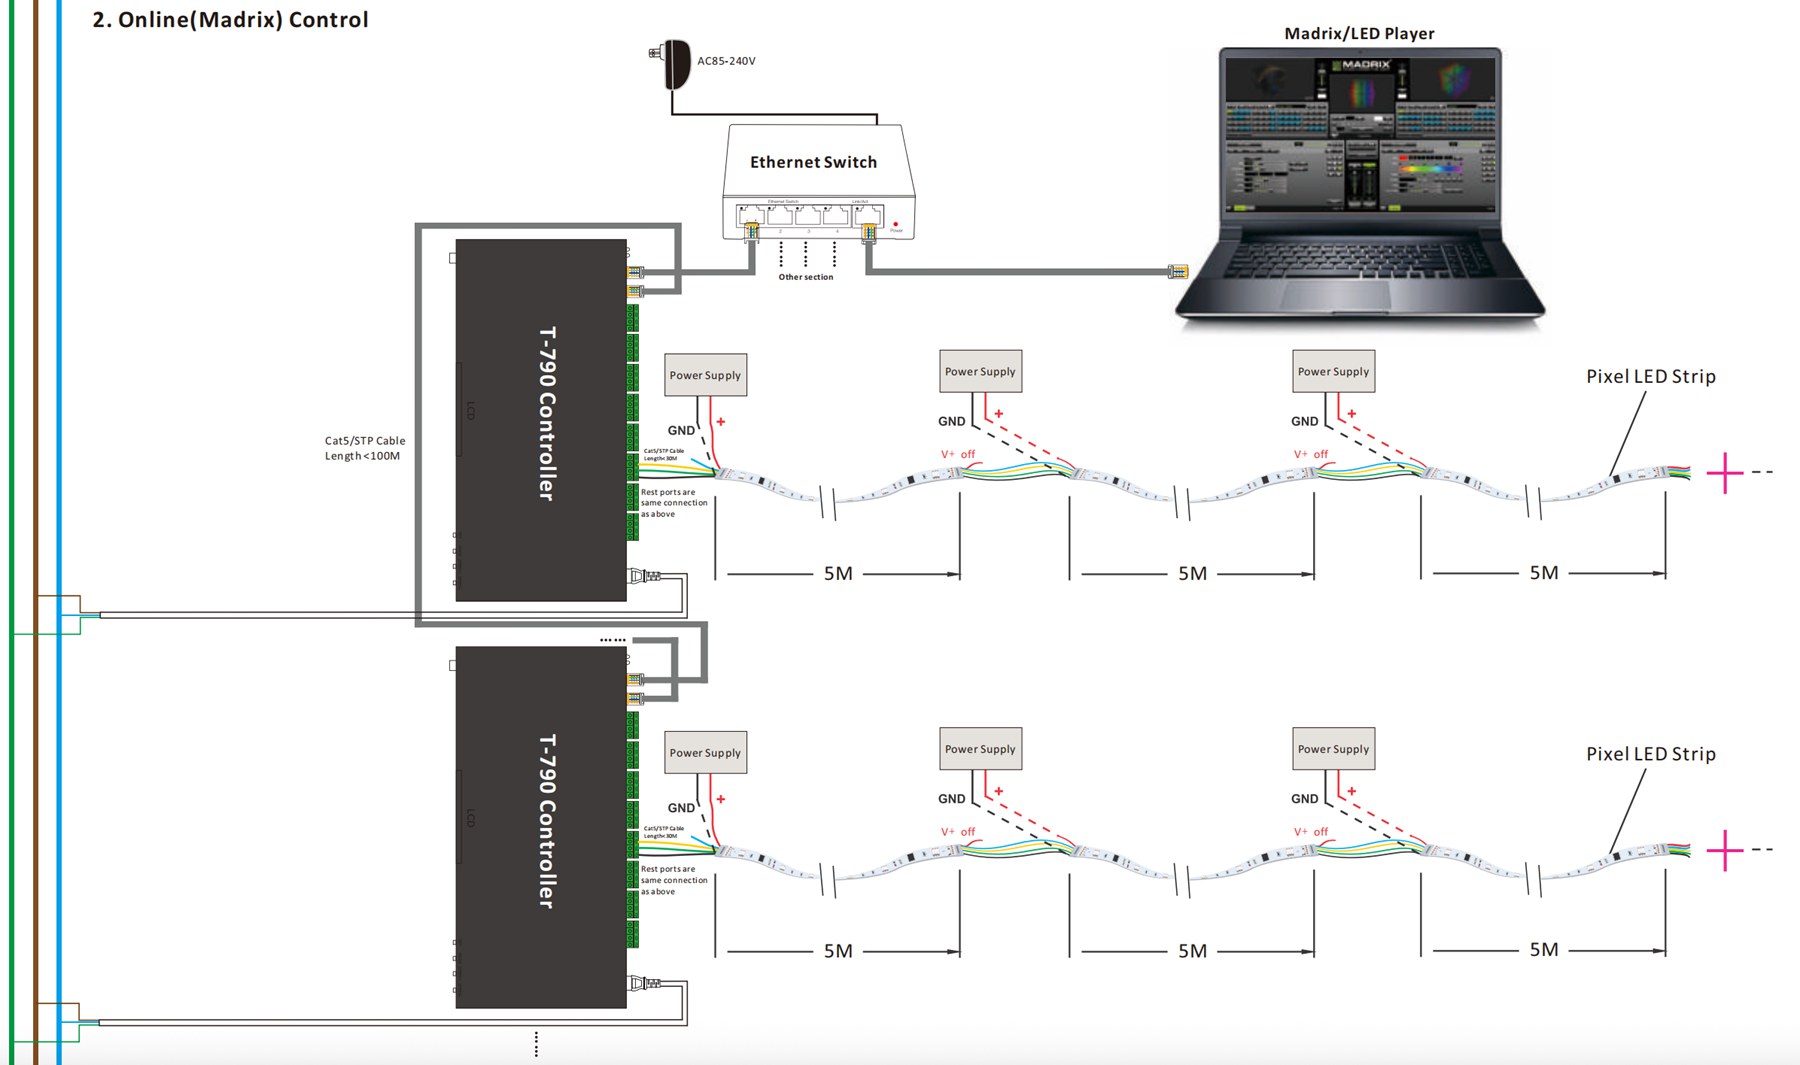
Online control is better for projects that need live playback and software programming. In this setup, a Madrix/LED Player computer connects to an Ethernet switch, and the switch connects to one or more controllers. Each controller then drives its own LED strip run.
This method is more flexible because effects can be edited and played in real time. The strip wiring remains the same: correct DC power, correct signal input, and power injection every 5 meters. The network side usually uses Cat5/STP cable with a distance of less than 100 meters.
Lighting console control wiring
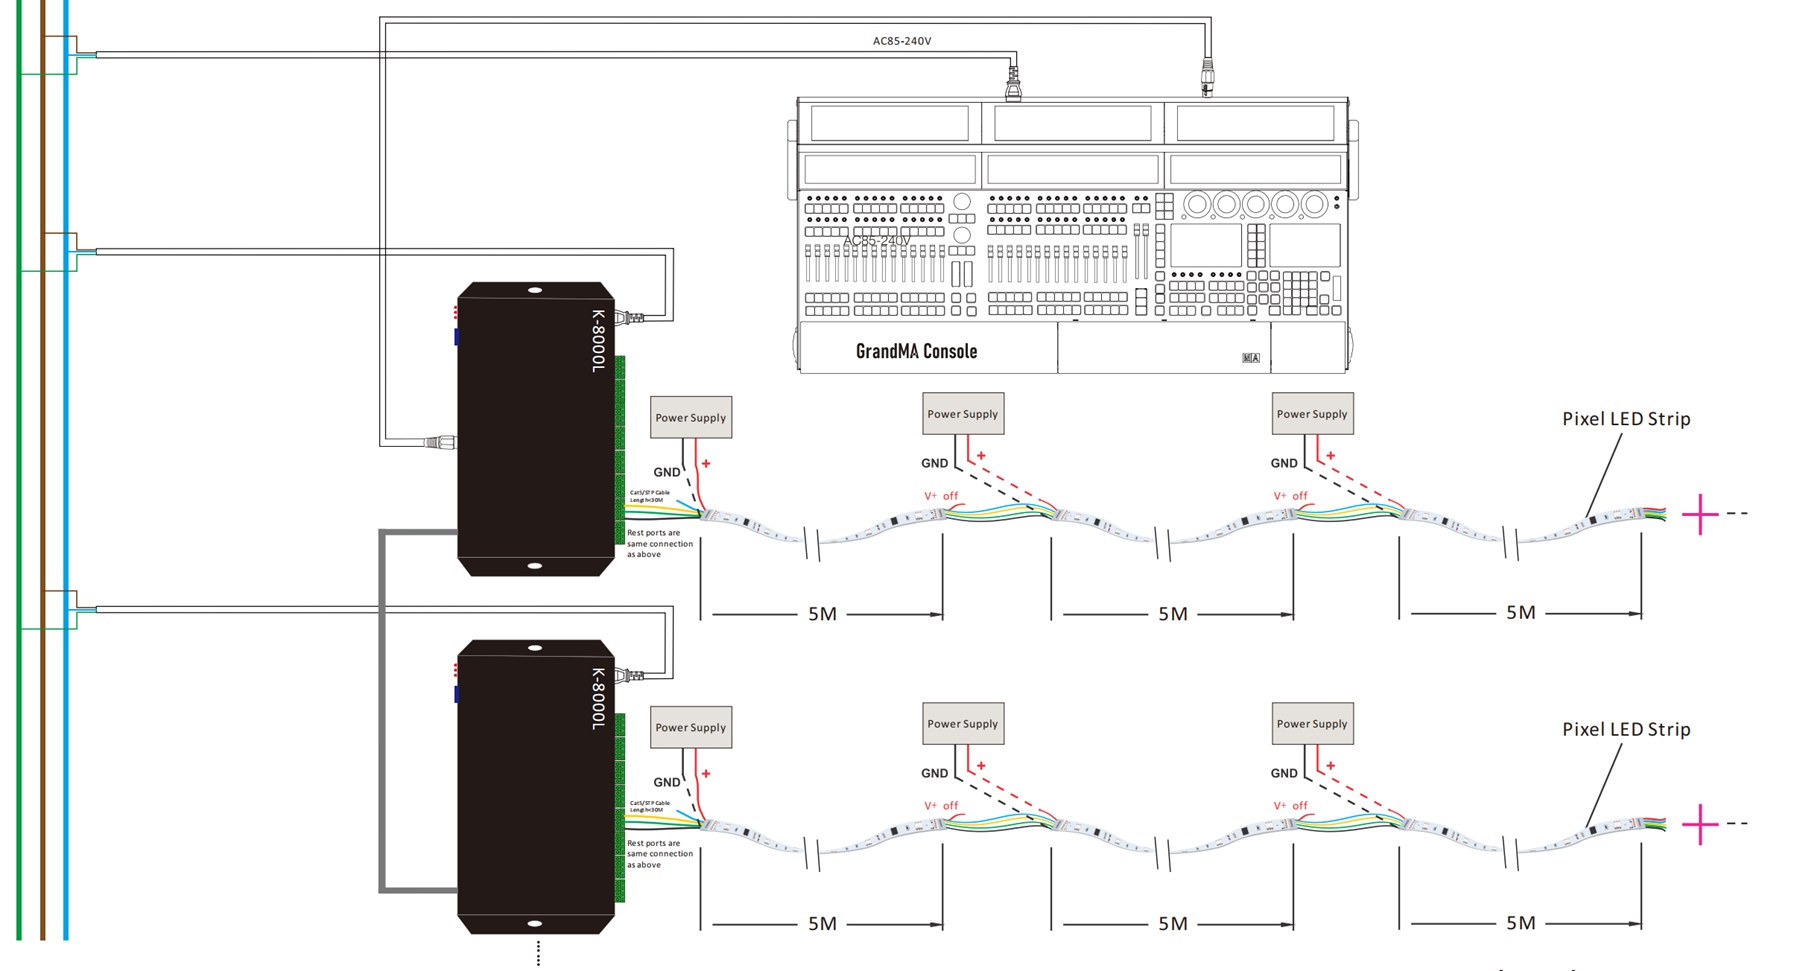
A DMX pixel LED strip system can also be connected to a lighting console, such as a GrandMA console. In this setup, the console sends control signals to the pixel controller, and the controller then drives the LED strip.
This method is suitable for stage projects where the LED strip needs to work together with other lighting fixtures. The basic strip-side wiring is still the same, with separate power supply and power injection every 5 meters.
Common controllers for DMX pixel LED strip projects
Choosing the right controller is an important part of a DMX pixel LED strip project. Different controllers are made for different project sizes and control methods, so the choice depends on whether the project needs offline playback, online software control, or a larger system setup.
For offline control, K-1000C is suitable for smaller projects and supports up to 2048 pixels. K-8000C and H803SA are better for larger offline projects, with support for up to 8192 pixels. H806SA is another offline controller for medium-sized projects, supporting up to 4096 pixels.


For online control, T-790 is a common choice for Madrix-based systems and supports up to 8192 pixels. For larger projects, H803TV is used as a DVI/HDMI master controller and can support up to 400000 pixels. H802RA is an Artnet/HDMI sub-controller that supports up to 4096 pixels and is suitable for more flexible control systems.


In simple terms, K-1000C, K-8000C, H803SA, and H806SA are mainly used for offline control, while T-790, H803TV, and H802RA are more suitable for online or larger system projects.
Common mistakes to avoid
One common mistake is using the wrong voltage. The strip voltage, power supply voltage, and controller setup should match the actual product.
Another common mistake is ignoring power injection. Even if the strip lights up at first, the far end may still have brightness loss or color shift if the run is too long.
It is also easy to connect the strip from the wrong side. Since pixel strips have signal direction, wiring the controller to the output end can make the strip fail to work.
Finally, signal cable length should not be too long. The diagrams already give a practical guide: keep the controller-to-strip cable within about 30 meters, and longer system connections should be handled through the proper control structure.
Conclusion
Wiring a DMX pixel addressable LED strip is not difficult once the strip type is confirmed. The first step is to know whether it is a 4-wire or 5-wire DMX strip. In most projects, the 5-wire type is more common. Then, make sure the voltage is correct, connect the signal wires to the right input pads, and add power injection every 5 meters for long runs.
For fixed projects, offline control is a practical choice. For dynamic effect playback, online Madrix control is more flexible. For stage applications, a lighting console can also be used with a suitable controller.
Most DMX pixel LED strips have fixed power because the current is already set by the IC. However, UCS512C4 is different because its power can be adjusted. With correct wiring, DMX pixel LED strips can deliver stable and reliable lighting performance.
FAQ
1. Do I need to match the power supply voltage to the LED strip voltage?
Yes, always.
If the strip is 5V, use a 5V power supply. If the strip is 12V, use a 12V power supply. If the strip is 24V, use a 24V power supply.
Using the wrong voltage may cause unstable performance or damage the strip.
2. Can a DMX pixel LED strip be controlled by a lighting console?
Yes. In professional lighting projects, a DMX pixel LED strip system can also be connected to a lighting console, such as a GrandMA console, through a suitable controller.
This is useful when the LED strip needs to work together with other stage lighting fixtures.
3. What happens if I connect the strip from the wrong end?
DMX pixel LED strips usually have a signal input direction. If the controller is connected to the wrong side, the strip may not work correctly.
So before wiring, always confirm the strip input side.
4. Why is my DMX pixel LED strip flickering or working unstably?
There can be several possible reasons, such as wrong voltage, weak power supply, no power injection on long runs, signal wiring error, cable too long, wrong controller setup, or wrong strip input direction.
In most cases, it is best to check the power supply first, then the wiring, then the controller settings.
5. Can I cut a DMX512 pixel LED strip to any length?
No, not usually.
A DMX512 pixel LED strip should be cut only at the marked cutting points on the strip. If the strip is cut at the wrong place, the circuit may be damaged and part of the strip may stop working.
Before cutting, it is best to check the product specification or the cutting marks printed on the strip.
6. Can different DMX512 LED strip models be used in the same project?
It is not recommended to use different DMX512 LED strip models in the same project.
Different models may have different voltage, wiring, IC types, and control settings, which can cause compatibility problems and make installation more difficult. For better stability and easier control, it is usually better to use the same model in one project.
ETL vs UL for LED Strip Lights
How to Wire SPI Pixel Addressable LED Strip Light?
Related Article


Need an Instant Quote For Your Upcoming Projects?
Send us the details and we will get back to you within 12 hours.