
How to Wire SPI Pixel Addressable LED Strip Light?
SPI pixel addressable LED strip lights are very popular in home decoration, commercial lighting, signs, stage projects, and media lighting systems. Compared with regular LED strips, SPI LED strips can create dynamic effects such as chasing, flowing, rainbow, scanning, and color changing.
But before wiring an SPI LED strip, one thing should be clear first: not all SPI LED strips use the same wire layout. Some strips only use one signal wire, some use a clock wire in addition to the data wire, and some use two signal wires for backup transmission.
So if you want the strip to work correctly, you should first know which type of SPI LED strip you are using, and then connect the controller, power supply, and strip in the right way.
Three types of SPI LED strips by wiring
1. Standard SPI LED strip with one signal wire
This is the most common type of pixel LED strip. It usually has V+, V- (GND), and one data signal wire.
Common examples include WS2811 LED strip, WS2812B LED strip, and WS2814A LED strip.
This type of strip is simple to wire. You only need to connect power and one data line from the controller to the strip. For many small and medium projects, this is the easiest option.
2. SPI LED strip with a clock line
This type of strip has V+, V- (GND), data wire, and clock wire. In other words, it has one more control line than the standard single-signal strip.
Common examples include WS2801 LED strip and SK9822 LED strip.
Because this type uses both data and clock signals, the controller must send both signals correctly. When wiring it, you need to connect V+ to V+, GND to GND, DAT to DI, and CLK to CI or the clock input pad on the strip.
3. Breakpoint-resume SPI LED strip / dual-signal SPI LED strip
This type of strip is also called a dual-signal SPI LED strip or breakpoint-resume LED strip. Besides V+ and V- (GND), it has two signal lines.
Common examples include WS2815 LED strip, WS2813 LED strip, and WS2818 LED strip.
The second signal line is not a clock line. It is a backup signal line. This means if one pixel is damaged, the signal can continue to pass through the backup line, so the rest of the strip can still work. That is why this type is very popular in longer runs and more demanding projects.
How to wire a breakpoint-resume SPI LED strip
Since the diagrams above are for dual-signal strips, let’s start with this type.
A breakpoint-resume SPI LED strip usually needs four main connections at the strip input side:

V+
GND
Main signal line
Backup signal line
On the strip side, the two signal pads are often marked as DI and BI. Different manufacturers may use slightly different names, so it is always a good idea to check the pad labels on the strip.
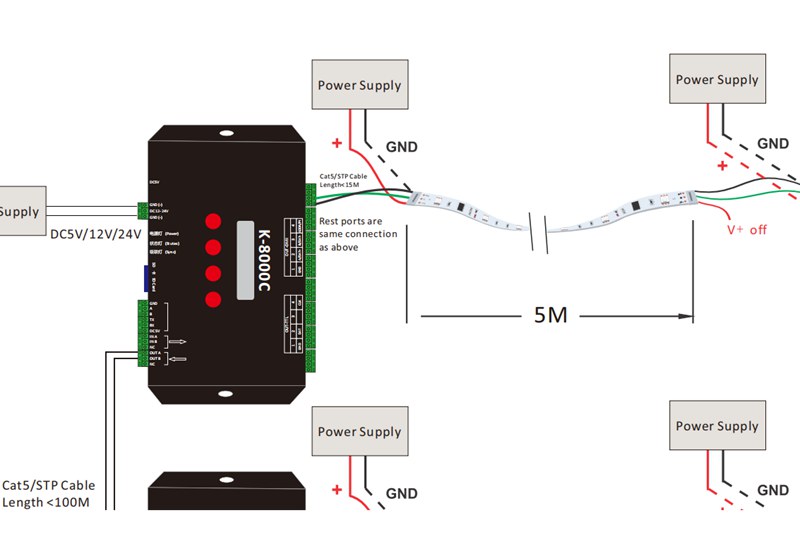
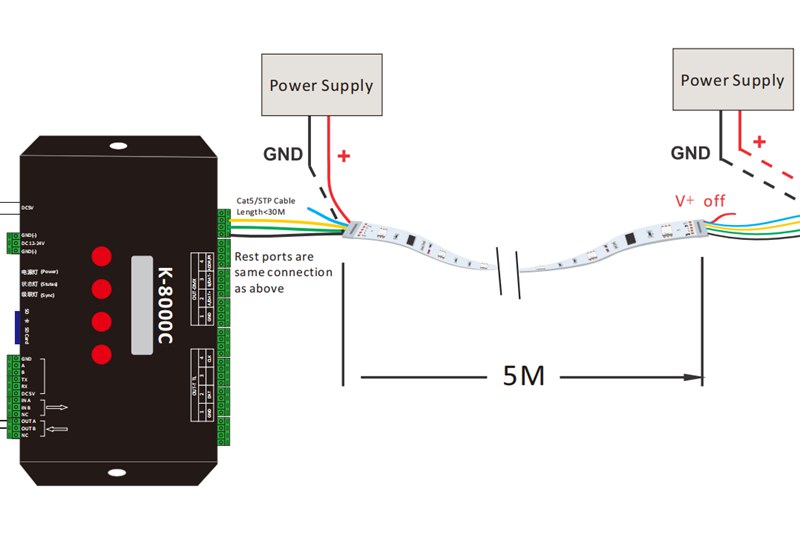
In a typical wiring setup, the controller connects to the strip input, and the power supply provides the correct DC voltage. For long runs, extra power is injected every 5 meters, as shown in your diagrams.
One important point in the diagrams is that at each power injection point, the positive V+ line is separated between sections, while the ground stays connected. This is a common way to avoid power conflict between multiple power injection points while keeping the signal stable.
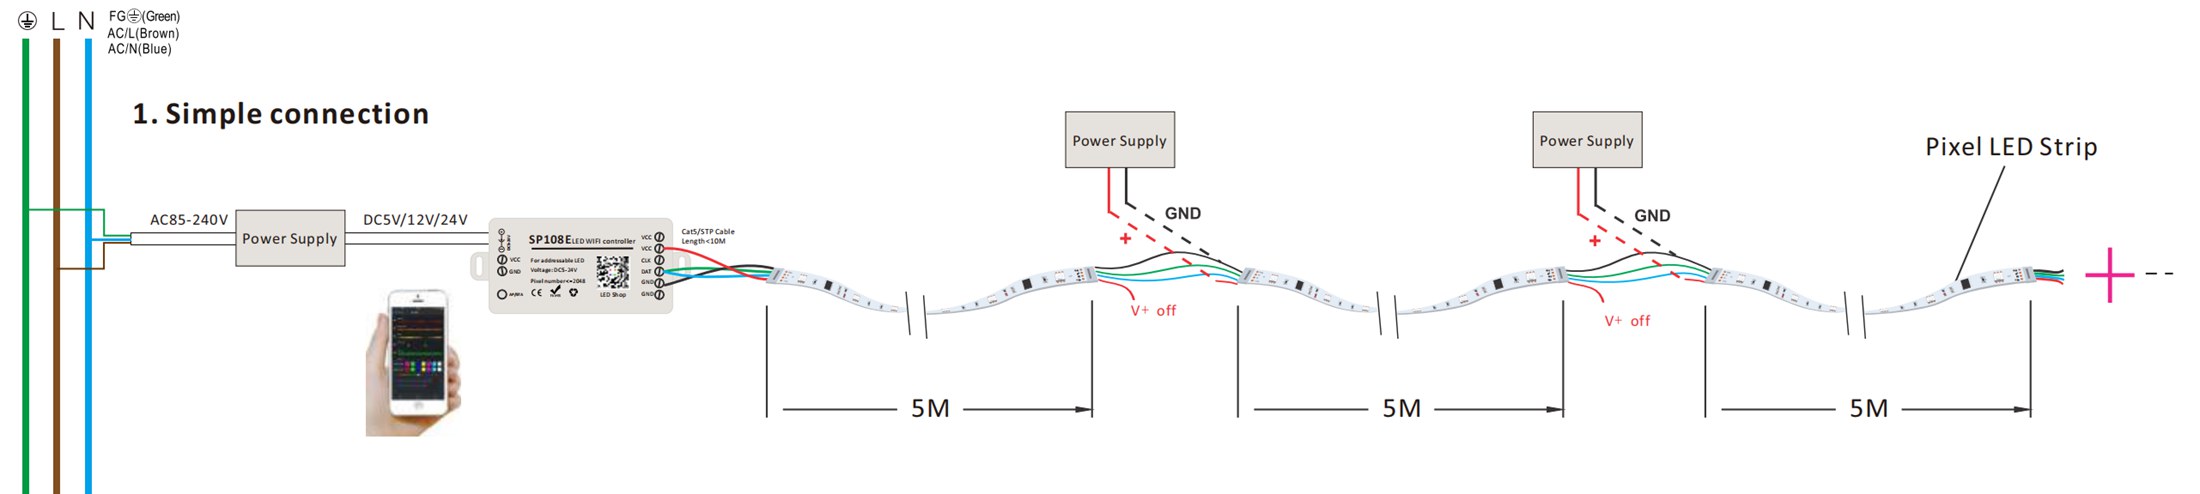
1. Simple connection
For a small project, a controller like SP108E or SP107E can be used for simple home applications. The power supply changes AC85-240V into DC5V / 12V / 24V, depending on the strip.
Then the controller is connected to the strip input. In your diagram, the cable between the controller and strip is Cat5/STP cable, and the recommended length is less than 10 meters.
After that, power is injected every 5 meters to keep the strip running normally over a longer distance.
2. Offline control
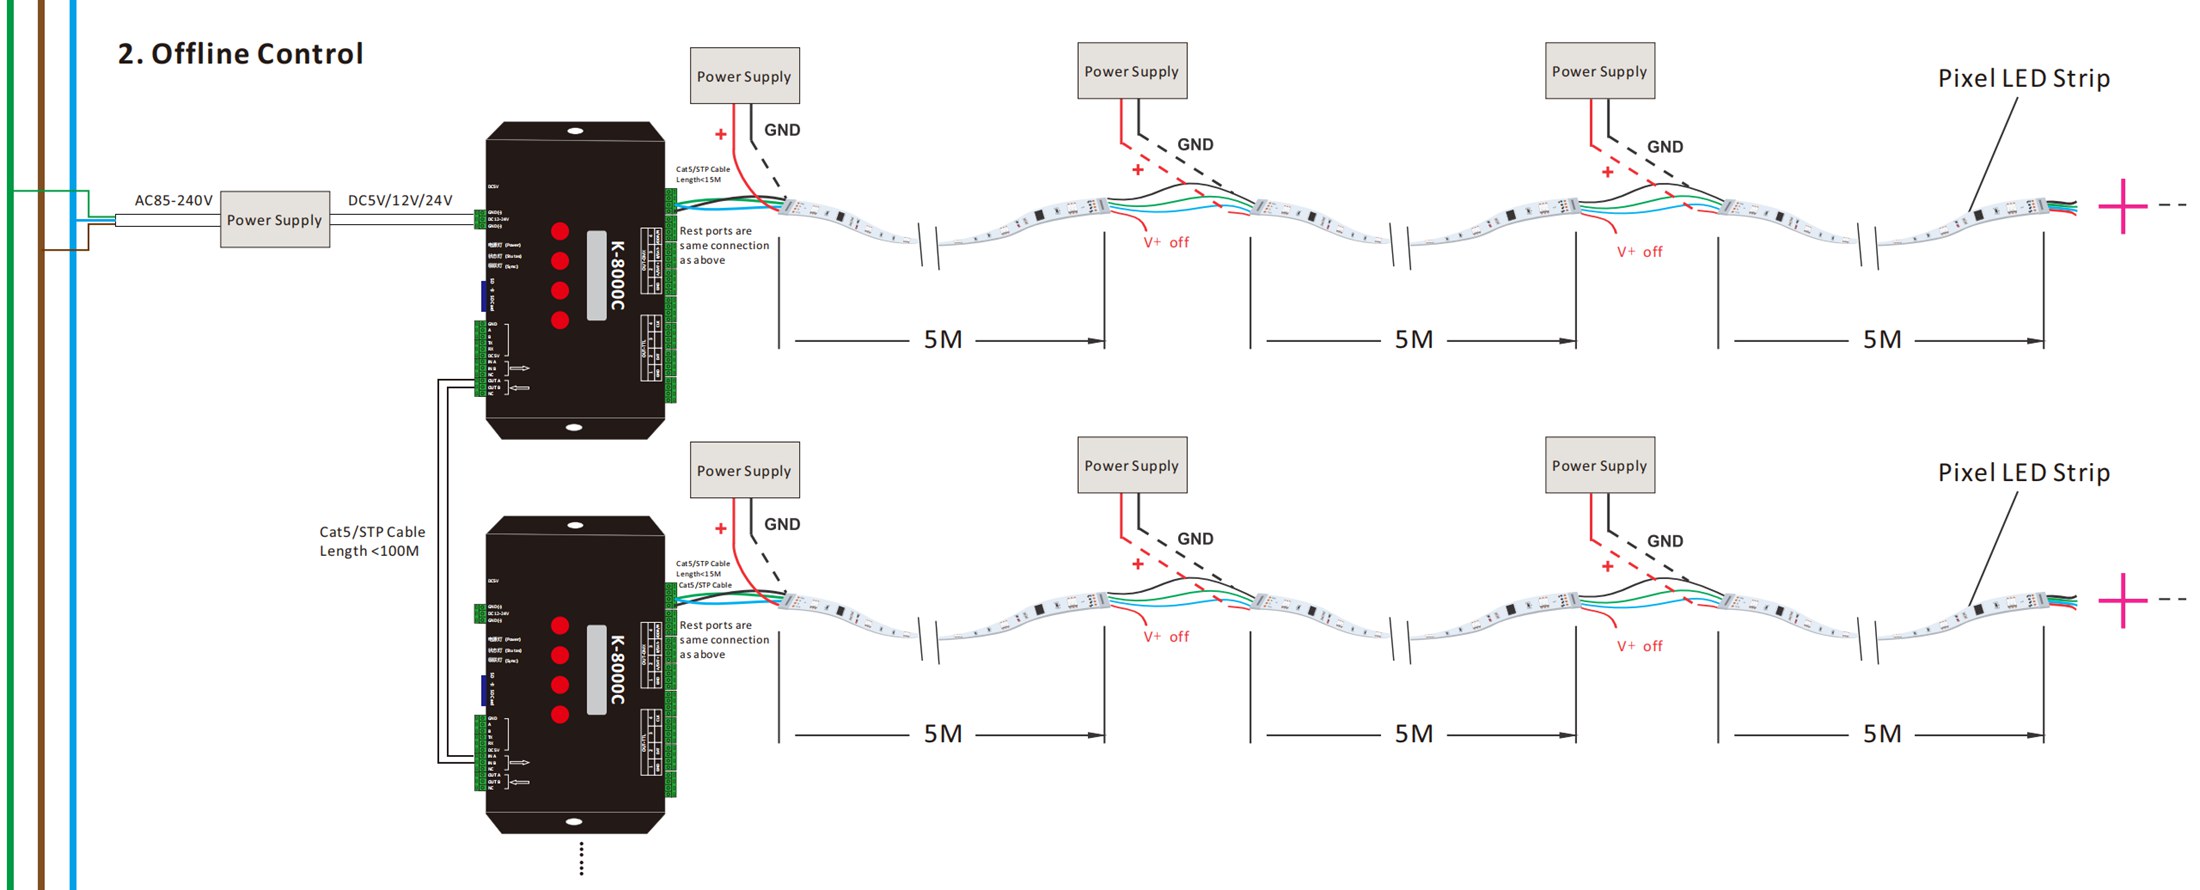
For larger projects, K-1000C and K-8000C are more suitable. These are offline controllers, so they can run saved programs without needing a live computer connection during operation.
In your wiring diagram, the controller sends signal to the strip, and each strip section still gets extra power every 5 meters. The cable between controllers can be longer, and the diagram shows Cat5/STP cable length less than 100 meters between control devices. The controller-to-strip connection is shown as less than 15 meters.
This setup is good for engineering projects, signs, building outlines, and other installations that need stable playback.
3. Online Madrix control
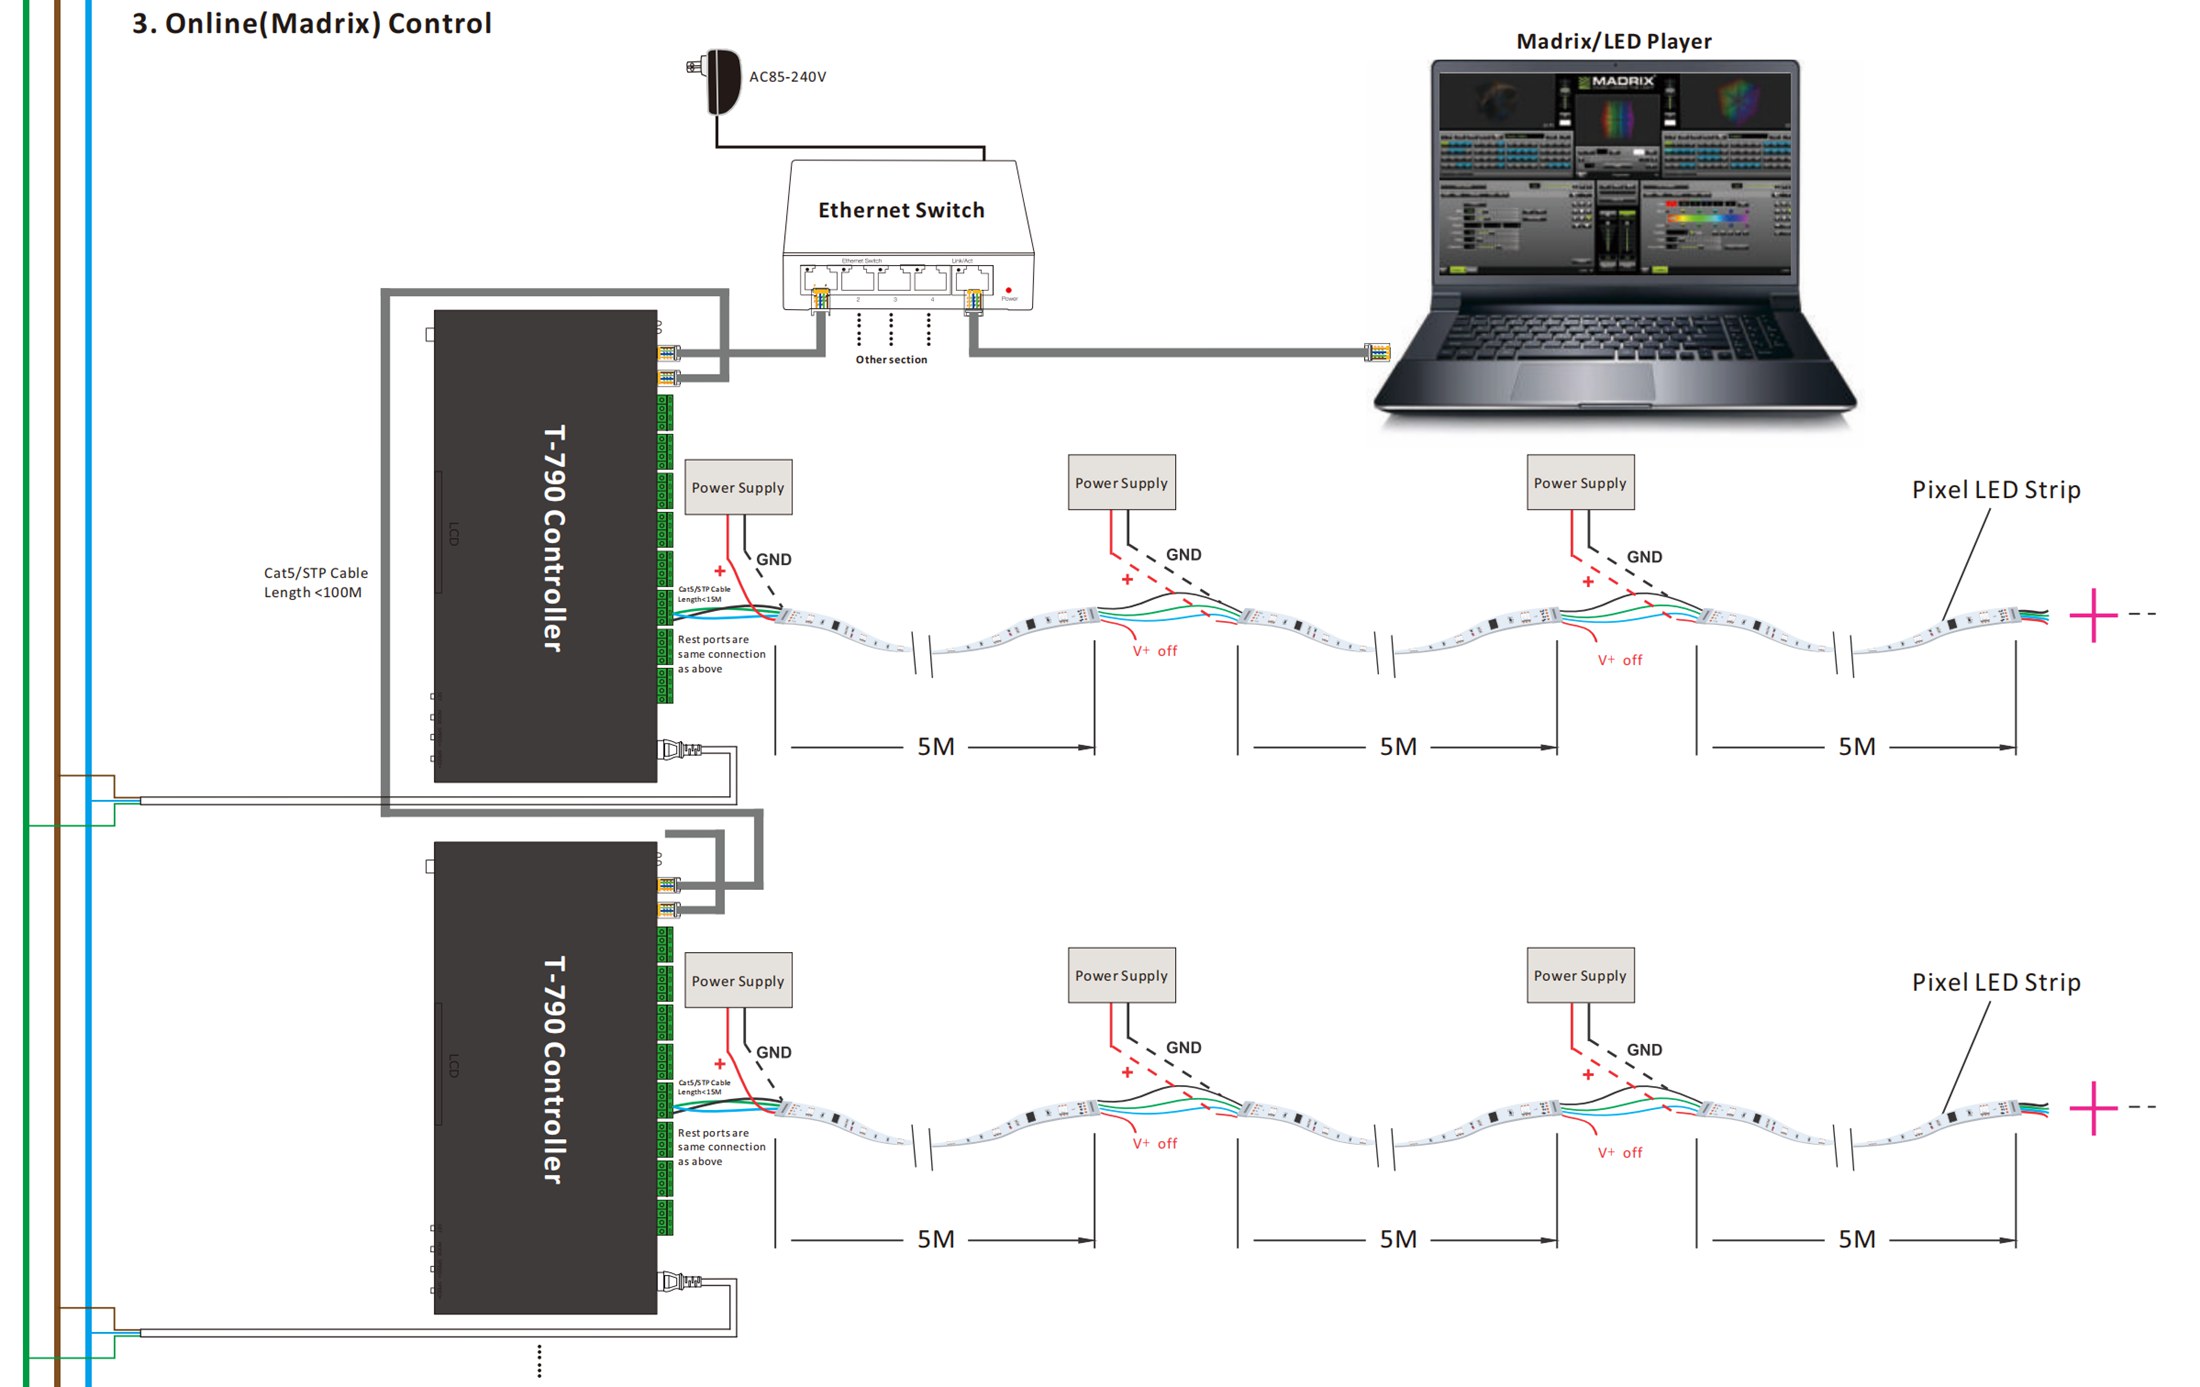
For live control or larger dynamic systems, T-790 controllers can be used with a computer and software such as Madrix. In this setup, the computer connects to an Ethernet switch, and the switch connects to the controllers. Then the controllers send signal to the LED strips.
This method is commonly used in larger projects where users want software control, live effects, or more advanced programming.
Again, the strip still needs power injection every 5 meters, and the same rule applies: keep the ground common, and do not connect all separate power injection positive lines together in the wrong way.
How clock-line SPI LED strips are wired
Now let’s talk about the second type: SPI LED strips with a clock line.
This type looks similar because it still has power wires and signal wires, but the difference is that it needs two control signals:
Data
Clock
So the normal wiring is:
V+ from power supply/controller to V+ on the strip
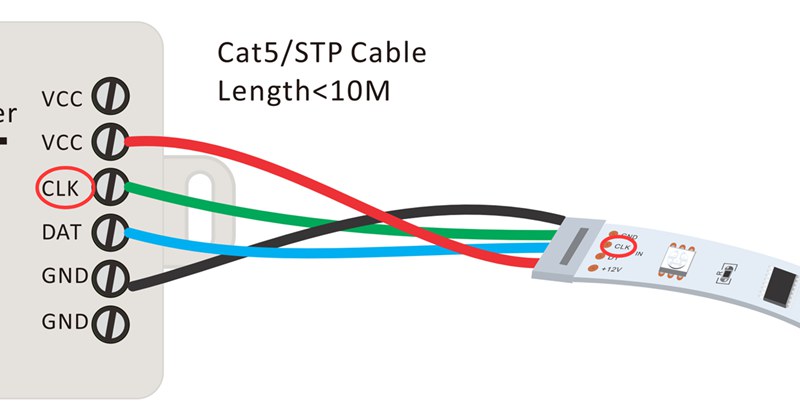
GND to GND
DAT from controller to DI
CLK from controller to CI / CLK
This means the controller must support clocked SPI output. If the controller only sends one data signal, it will not properly drive a strip like WS2801 or SK9822.
Main difference from breakpoint-resume strips
This part is easy to confuse, honestly, because both types have “one extra wire.”
But the extra wire is not the same thing.
For a clock-type SPI LED strip, the extra wire is a clock line, used to synchronize data transmission.
For a breakpoint-resume SPI LED strip, the extra wire is a backup signal line, used to keep the signal going if one pixel fails.
So even though both strips have more than one signal-related wire, their function is different, and the wiring logic is also different. You should not simply treat the backup line as a clock line.
How standard single-signal SPI LED strips are wired
You only need:
V+
GND
Data
Typical connection is:
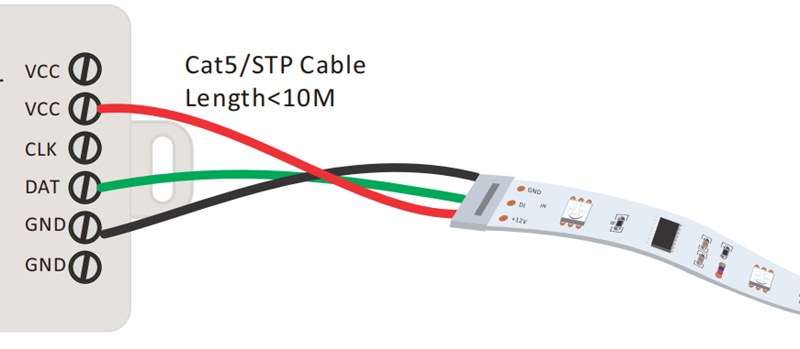
V+ to V+
GND to GND
DAT to DI
This is the common wiring method for strips like WS2811, WS2812B, and WS2814A.
Main difference from clock-line strips
Compared with clock-line SPI LED strips, the standard single-signal strip does not need a clock wire. So the wiring is simpler, the number of wires is smaller, and installation is usually easier.
Main difference from breakpoint-resume strips
Compared with dual-signal breakpoint-resume strips, the standard single-signal strip has only one signal line. That means if one pixel fails in a bad way, the signal may stop there and the rest of the strip may not work.
So from a wiring point of view, single-signal strips are simpler. But from a reliability point of view, breakpoint-resume strips are usually better for long runs or projects where maintenance is harder.
Quick comparison of the three wiring types
If we put it simply:
A standard single-signal SPI LED strip uses power + one data line. It is simple and widely used.
A clock-line SPI LED strip uses power + data + clock. It needs a controller that supports both signals.
A breakpoint-resume dual-signal SPI LED strip uses power + two signal lines. The second signal line is for backup, not for clock.
That is the key difference.
Power injection for long SPI LED strip runs
No matter which type of SPI LED strip you use, power injection is still very important in long runs.
In our diagrams, you can see that the power is injected every 5 meters. This is a common and practical method. As the strip gets longer, voltage loss becomes more obvious. Without extra power, brightness may drop and colors may shift, especially on white or high-brightness effects.
So even if the signal wiring is correct, the strip still needs enough power along the run.
How to choose the right controller
Different projects need different controllers.
For simple home use, controllers like SP108E and SP107E are a good choice. Both support DC5-24V input, both support SPI signal, and both can control up to 2048 pixels. SP108E is a WiFi magic LED controller, while SP107E is a Bluetooth LED music controller. These are good for bedrooms, living rooms, TV backlights, and other small decorative projects.


For offline control projects, K-1000C and K-8000C are more suitable. They support SPI and DMX512. K-1000C can control up to 2048 pixels, while K-8000C can control up to 8192 pixels. These controllers are often used when the lighting effect is stored in the controller and runs without a phone or computer.


For online control projects, T-790 is a common choice. It supports SPI and DMX512, works with AC100-240V, and can control up to 8192 pixels. It is suitable for larger projects that need software control.
For very large systems, controllers like H803TV and H802RA are often used. H803TV is a DVI/HDMI master controller and can support up to 400000 pixels. H802RA is an Artnet/HDMI sub-controller and can support up to 4096 pixels. These are more suitable for big engineering projects and online or mixed control systems.


Final thoughts
Wiring an SPI pixel addressable LED strip is not only about matching positive and negative wires. The first thing is to know which wiring type your strip belongs to.
If it is a standard single-signal LED strip, the wiring is the easiest: V+, GND, and Data.
If it is a clock-line SPI LED strip, you also need to connect the clock wire correctly.
If it is a breakpoint-resume dual-signal LED strip, you need to connect two signal lines, and the second one is for backup transmission, not for clock.
The wiring diagrams in this article are based on breakpoint-resume SPI LED strips, so the examples focus on that type. At the same time, the basic difference from clock-type strips and normal single-signal strips is also very important, because many people mix these three types together at the beginning.
Once you choose the correct controller, match the right voltage, connect the wires in the correct order, and add power injection every 5 meters, the SPI LED strip system can run much more stably and safely.
FAQ
1. Can I connect a clock wire to the backup signal wire?
No. These two wires are not the same.
A clock wire is used to control signal timing.
A backup signal wire is used to continue signal transmission if one pixel fails.
So they should not be connected as if they are the same function.
2. How do I know what type of SPI LED strip I have?
The easiest way is to check the strip label, product page, or chip model.
For example:
WS2811 / WS2812B / WS2814A are usually standard single-signal types
WS2801 / SK9822 are usually clock-line SPI types
WS2813 / WS2815 / WS2818 are usually dual-signal breakpoint-resume types
You can also check the solder pads on the strip. If the strip has pads like DI and BI, it is usually a dual-signal strip. If it has DI and CI/CLK, it is usually a clock-line strip.
3. Do I need to match the power supply voltage to the LED strip voltage?
Yes, always.
If your strip is 5V, use a 5V power supply.
If your strip is 12V, use a 12V power supply.
If your strip is 24V, use a 24V power supply.
Using the wrong voltage may cause unstable work, poor brightness, or even damage the strip.
4. Why does my LED strip become dim or change color at the far end?
This is usually caused by voltage drop.
When the strip is long, the voltage becomes lower at the far end. Because of that, the LEDs may become dim, the white color may turn yellow, or some colors may look wrong.
The usual solution is to add power injection. In many projects, power is added every 5 meters.
5. Why do I need power injection every 5 meters?
Because long LED strip runs use a lot of current.
Even if the strip is working at the beginning, the voltage may not stay strong enough over a long distance. Adding extra power every 5 meters helps keep the brightness stable and reduces color shift.
6. Should all grounds be connected together?
Yes. In most SPI LED strip systems, the controller ground and the strip ground should share a common ground.
If the grounds are not connected properly, the signal may become unstable, and the strip may flicker, show wrong colors, or not respond at all.
7. What happens if I connect the strip from the wrong end?
Most SPI pixel LED strips have a signal direction. If you connect the controller to the output end instead of the input end, the strip usually will not work correctly.
Always check the arrow mark or the input/output pad labels before wiring.
8. Can I use one controller for any SPI LED strip?
No, not always.
The controller must support the signal type of the strip. A controller for a standard single-signal strip may not work correctly with a clock-line strip. In the same way, a controller must also support a dual-signal strip properly if that is what you are using.
So before wiring, always check both the strip IC model and the controller signal type.
9. Can I use one power supply for the whole LED strip?
For a short strip, yes, sometimes one power supply is enough.
But for longer runs, one power feed is often not enough because of voltage drop. In that case, you still may use one large power supply, or several power supplies, but you need to add power injection at proper points.
10. How far can the controller be from the LED strip?
That depends on the controller type and wiring method.
In the simple connection diagram, the Cat5/STP cable length is less than 10 meters.
In the offline and online control diagrams, the controller-to-strip signal cable is usually kept within 15 meters, and the controller-to-controller or network cable can be less than 100 meters.
Keeping the signal cable within the recommended length helps make the system more stable.
11. Why is my SPI LED strip flickering or working unstably?
There can be several reasons:
- wrong voltage
- weak power supply
- no power injection on long runs
- bad ground connection
- signal cable too long
- wrong controller setting
- wrong strip type selected in the controller
- wiring to the wrong strip end
Usually, the best way is to check the power first, then the ground, then the signal wiring.
12. Is a dual-signal SPI LED strip better than a standard one-signal strip?
It depends on the project.
A standard one-signal strip is simpler and often cheaper. It is good for many normal uses.
A dual-signal strip is usually better for longer runs or places where reliability matters more, because if one pixel fails, the backup signal may still let the rest of the strip keep working.
So dual-signal strips are often a better choice for bigger or harder-to-maintain projects.
How to wire DMX pixel addressable LED Strip Light
How to wire a RGB LED Strip Light?
Related Article
Need an Instant Quote For Your Upcoming Projects?
Send us the details and we will get back to you within 12 hours.