
How to Design LED Strip Light in the Bathroom?
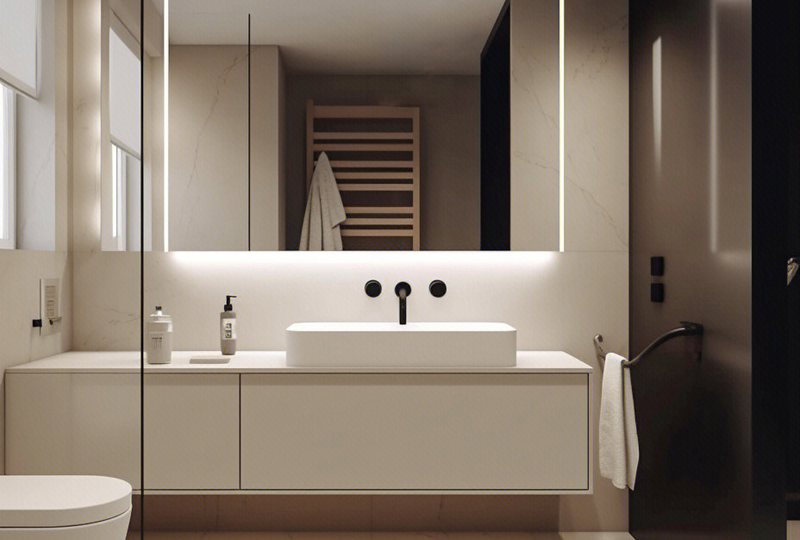
LED strip lights have revolutionized bathroom design, offering both functionality and aesthetic appeal. Whether you want a spa-like retreat, modern elegance, or practical task lighting, LED strips provide versatile solutions. This guide covers placement ideas, lighting types, technical considerations, and FAQs to help you create the perfect bathroom ambiance.
Best Places to Install LED Strip Lights in the Bathroom
The most popular installation spots include under the vanity for task lighting, around mirrors for grooming, inside shower niches for ambiance, along baseboards for safety lighting, behind the bathtub for a spa-like feel, in ceiling coves for general illumination, and under cabinets for subtle accent lighting. Each location serves a specific purpose while enhancing your bathroom's overall aesthetic.
1. Under the Vanity

LED strips mounted beneath the vanity create a floating effect while providing functional task lighting. This placement is ideal for early mornings or late nights when you need soft, glare-free illumination. Choose 3000K-4000K color temperature for natural-looking light that helps with skincare routines and makeup application. For best results, install the strips in LED aluminum channels to diffuse light evenly and prevent hotspots.
2. Around the Mirror

Backlit mirrors with LED strips offer professional-grade lighting for grooming. Opt for high-CRI (90+) LED strips to ensure accurate color representation—critical for makeup and shaving. For modern aesthetics, consider edge-lit mirrors with hidden LED channels. Dimmable strips allow you to adjust brightness, from bright morning prep to relaxing evening ambiance.
3. Inside Shower Niches

LED-lit shower niches transform ordinary shelves into luxurious design features. Use IP68 waterproof LED strips (safe for direct water contact) to highlight shampoo bottles or decorative tiles. Warm white (2700K-3000K) creates a spa-like feel, while RGB LED strips add customizable color for mood lighting. Ensure proper sealing and professional installation to prevent water damage.
4. Along Baseboards
Baseboard lighting provides subtle pathway illumination, perfect for nighttime bathroom visits. Low-profile LED strips (800-1000 lumens total) cast a soft glow without being overwhelming. This is also a smart safety feature, reducing tripping hazards. Choose warm white (2700K) for a cozy ambiance that complements most bathroom styles.
5. Behind the Bathtub

Backlighting a freestanding tub creates a five-star hotel atmosphere. Waterproof LED strips (IP65+) installed along the tub's base or behind a headboard wall emit a relaxing glow. Pair with dimmable controls to set the perfect mood for baths—bright for cleaning, soft for soaking. For extra luxury, add RGB LED strips that transition between calming colors.
6. In Ceiling Coves
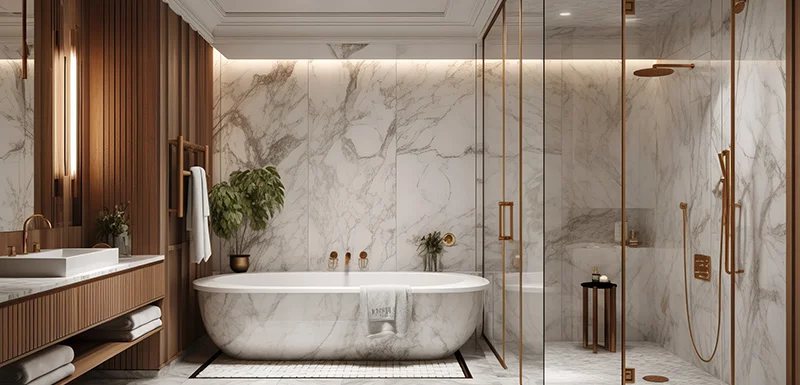
Recessed ceiling coves with LED strips produce indirect ambient lighting that mimics natural sunlight. This placement eliminates harsh shadows while making small bathrooms appear larger. Use 5000K cool white high efficiency LED strip for a clean, modern look or tunable white LED strips to adjust from warm to cool tones. Ideal for bathrooms with high ceilings.
7. Toilet Area
Often overlooked, toilet lighting enhances safety and sophistication. A discreet LED strip behind the toilet tank or under the seat provides gentle nighttime illumination. Motion-activated strips are energy-efficient options. Stick to warm white (2700K) to avoid harshness in this small space.
Key Technical Considerations for Bathroom LED Strip Lighting
1. IP Rating: Protection Against Moisture
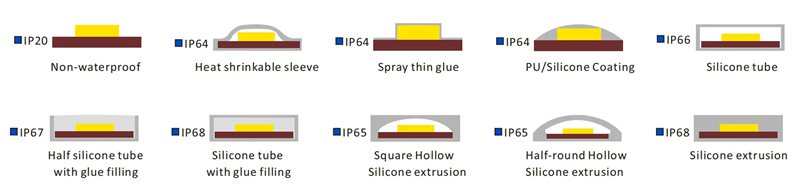
Water resistance is critical in bathroom environments. The IP (Ingress Protection) rating indicates how well lights resist dust and moisture:
IP65: Protects against water jets (ideal for near showers, vanities, and mirrors)
IP68: Fully waterproof (required for inside showers, bathtub surrounds, and wet niches)
Non-rated strips will fail quickly due to humidity - always verify the IP rating before purchase.
For steam-heavy areas like sauna-style showers, IP68 with silicone coating provides maximum durability.
For more detail, you can check: The Ultimate Guide To Waterproof LED Strip Light in 2025
2. Brightness: Matching Lumens to Purpose
The ideal brightness for your LED strips depends on both the room's dimensions and its intended function. Lumens per foot (lm/ft) is the key metric for measuring light output.
Brightness Recommendations by Application
| Application | Lumens per Foot | Best For |
| Subtle Accent Lighting | 80-100 lm/ft | Decorative highlights, toe kicks, shelving |
| Enhanced Accent/Soft Ambient | 150-300 lm/ft | Cove lighting, bathtub surrounds, mood lighting |
| General Ambient/Task Lighting | 300-400 lm/ft | Vanity areas, mirror lighting, shower illumination |
| Primary Task Lighting | 350-500 lm/ft | Makeup application, shaving, detailed grooming |
| High-Intensity Task Lighting | 700+ lm/ft | Professional-grade vanity lighting, large mirrors |
3. Color Temperature: Setting the Right Mood
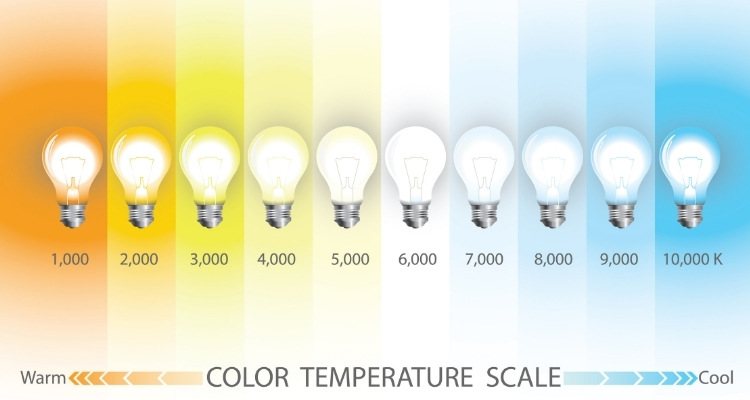
The Kelvin (K) scale defines light warmth:
1800K-2700K: Candlelight to warm white (cozy, relaxing)
3000K-3500K: Neutral white (balanced for daily use)
4000K-5000K: Cool white (energizing, ideal for makeup mirrors)
Advanced Option: Tunable white LED strips (2700K-6000K) adjust from warm to cool via app control. Or Dim to warm LED Strip that introduces the ability to dim from warm white (3000K) to a warm, cozy ultra warm white (1800K) just like a classic incandescent bulb or old traditional Edison light bulbs that have a tungsten filament..
For more detail, you can check: 2700K vs 3000K vs 4000K vs 5000K vs 6500K, which one is better?
4. CRI: Color Accuracy Matters
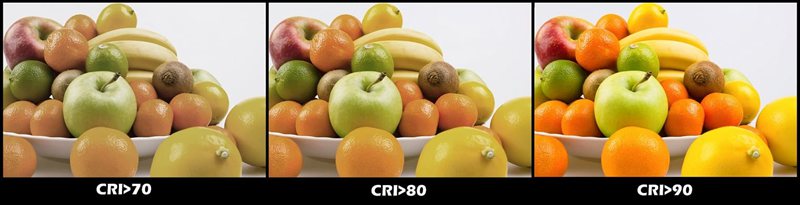
The Color Rendering Index (CRI) measures how accurately lights reveal colors:
CRI <80: Washes out skin tones (avoid for mirrors)
CRI 90-95: Professional-grade accuracy (ideal for makeup application)
CRI 95+: Studio-quality color perfection
For vanity lighting, pair 90+ CRI with 4000K color temperature for truest color representation.
5. Additional Technical Factors
Voltage Selection: 12V (shorter runs) vs 24V (longer installations, less voltage drop)
PCB Quality: Look for 2oz+ copper circuit boards for better heat dissipation
Warranty: Premium brands offer 3-5year warranties vs 1-2 years for cheap imports
Certifications: CE, RoHS, RCM, UKCA, BIS, CB, ISO9001 certificates ensures electrical safety
Common Mistakes to Avoid
One major error is using regular, non-waterproof LED strips in wet areas like showers or near bathtubs. These will quickly get damaged by moisture. Another oversight is ignoring voltage drop in longer installations - for runs over 16 feet with 12V strips, the lights at the end will appear dimmer.
People often mix different color temperature strips in the same space too, which looks inconsistent and unprofessional.
Many DIYers skip using diffuser channels, resulting in unattractive bright spots where individual LEDs are visible.
Perhaps most importantly, some forget to check local electrical codes, which could lead to unsafe installations or violations. Other common slip-ups include not properly measuring the installation area first, using the wrong type of connectors, or failing to test the lights before final installation. Taking time to avoid these simple mistakes will ensure your bathroom lighting looks great and lasts for years.
FAQs
1. Can I use regular LED strips in the bathroom?
No, standard LED strips aren't suitable for bathrooms due to high humidity. You need waterproof strips with:
• IP65 rating (protected against water jets) for areas near showers/sinks
• IP68 rating (fully submersible) for inside shower stalls
• Silicone coating to prevent moisture damage
Non-waterproof strips may develop electrical issues or discoloration within months.
2. How do I install LED strips around a mirror?
For perfect mirror lighting, use high-CRI (90+) LED strips in aluminum channels for even diffusion. Install either behind the mirror for soft ambient glow or along the edges for task lighting. Maintain a 2-4 inch gap from the wall to prevent shadows. Choose waterproof (IP65+) strips and connect to a dimmer for adjustable brightness. This creates flawless, functional lighting for grooming while enhancing your bathroom's aesthetics.
3. Can LED strips replace main bathroom lights?
Yes, LED strips can effectively replace main bathroom lights when properly planned. High-output strips (500+ lumens/ft) installed around mirrors, ceilings, or vanities can provide ample illumination if evenly distributed. For best results, combine multiple strips to eliminate shadows, ensure uniform brightness. However, task zones like makeup areas may still benefit from supplemental lighting.
4. Do I need an electrician to install LED strips?
Yes, you should hire an electrician for bathroom LED strip installations.
A professional ensures safe wiring, proper waterproofing (IP65/IP68), and compliance with electrical codes—especially near showers or tubs. This prevents hazards and guarantees optimal performance. For plug-in strips in dry areas, DIY may work, but consult an electrician if unsure.
5. How long do LED strips last in bathrooms?

Lifespan varies by quality:
1)Premium LED strips: 50,000-100,000 hours (5-10+ years)
2)Budget LED strips: 20,000-30,000 hours (2-3 years)
3)Cheap LED strips: 10,000 hours (1 years)
6. Can I dim LED strip lights?
Yes, most LED strip lights can be dimmed when paired with compatible controls. You'll need either a PWM (pulse-width modulation) dimmer for basic systems or a smart controller for app/voice control (like Alexa or Google Home).
7. How do I hide LED strip wires in the bathroom?
Hiding LED strip wires in your bathroom requires strategic placement and concealment solutions. Tuck wires behind mirrors, vanities, or cabinets for a clean look, or use paintable cable channels along edges and corners. For permanent installations, route wiring through walls or under baseboards using low-profile conduits. Choose flat, adhesive-backed wires when possible, and consider wireless controllers to eliminate visible cords. Always ensure proper waterproofing for any wires in damp areas while maintaining easy access for future maintenance.
8. Can I cut LED strips to fit my bathroom?
Yes, you can cut LED strips to fit your bathroom, but only at the marked cutting points (typically every 2-3 LEDs). Use sharp scissors for clean cuts, and seal cut ends with waterproof silicone for bathroom installations. For reconnection, use solderless connectors or soldering, ensuring proper insulation.
Conclusion
LED strip lighting offers a perfect blend of functionality, style, and ambiance for modern bathrooms. Whether you're looking to create a spa-like retreat, enhance task lighting for grooming, or add decorative accents, LED strips provide versatile solutions for every need.
How to choose a suitable LED Strip Light in 2026?
The Ultimate Guide to CSP LED Strip Lights
Related Article
Need an Instant Quote For Your Upcoming Projects?
Send us the details and we will get back to you within 12 hours.